A Snowy Scouting Mission

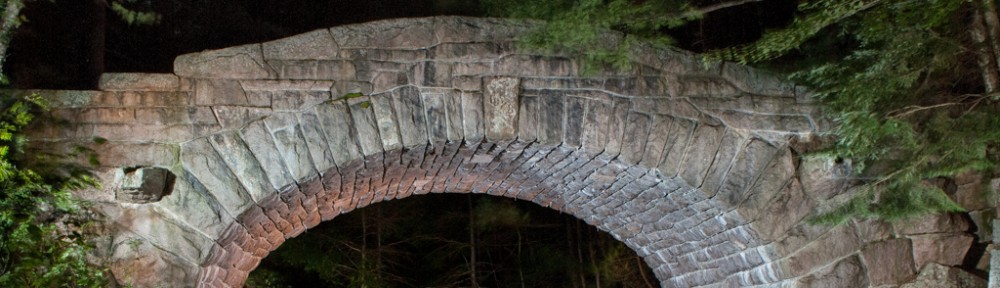
On New Year’s Day, Brenda and I strapped on our snowshoes to assess the conditions for our next shoot at Stanley Brook Bridge, since there had been two significant snowfalls after our original scouting mission. The area was truly a winter wonderland, with snow clinging to all the trees. There was a single set of snowshoe tracks, so the area was relatively untouched. The bridge was beautiful! On the north side, the snow clung to every stone, and filled the vertical cutouts at the railing. During our original scouting mission, we picked a site from the south side of the bridge, down across the small stream. We couldn’t even find the site with all the snow. And some of the snow had melted from the south face of the bridge. So we scouted out a new vantage point from the north.

Here’s the shot:

Stanley Brook Bridge Light Painting Acadia National Park

I was concerned the snow would melt before the scheduled bridge shoot, four days later. Brenda suggested that we try to light paint the bridge tomorrow evening. I started rabidly calling the light painters for an impromptu bridge shot on Jan 2nd, the day everyone returns to work and school. I could only find a couple of folks on such short notice. We would have to wait until Saturday and cross our fingers hoping for cold, clear days without any rain or melting.

Dual Bridge Scouting

Tom, Marguerite, and I decided to scout two bridges in one afternoon. We wanted to see Deer Brook Bridge and Chasm Brook Bridge. There’s no safe approach for either of these bridges with snow on the ground. We need to fit them into the rotation before the snow falls.  We’re saving easy drive-up and shoot bridges (Eagle Lake, Jordan Pond Road, Duck Brook and even Stanley Brook) for the snow.

The weather was beautiful and we enjoyed our hike and bridge scouting. We all took plenty of photos too. There was a heavy rainfall over the past couple of days, giving us opportunities to shoot waterfalls. After 1.2 miles we arrived at Deer Brook Bridge and I determined the best position for the camera. I must haven taken 30 shots and about 5 different angles / locations.  I finally settled on what I think captures the unique features of this bridge. I left thinking we’re gonna need lots of folks – this will be the first attempt at shooting a double arched bridge. I hope we can hide the people and light the underside of both arches.

We continued on to Chasm Brook Bridge as Tom announced, “It’s about the same distance we’ve already hiked.”  Basically, we were halfway there. So another 1.2 miles and more stops to take pictures along the way. When we arrived, both Tom and I hiked up to the waterfalls and snapped a few shots. Here’s the one I took.

The first place my tripod landed to shoot the bridge was the location to capture the image.  Snapped a couple of shots, showed Tom and packed up to head home. It was about six hours from start to finish – boy, I’m a slow walker. On a personal note, I came up with a new configuration for holding my camera and tripod in my backpack. It’s a more efficient way to pack and unpack the gear. I was considering a new backpack – for now, I’ll give this a try and see how it works out.

Recon-Recon Mission

Brenda and I invited Tom and Marguerite out for an early morning boat ride. Tom and Marguerite met us at 8:30 and we decided to skip the boat due to strong winds that could lead to heavy seas. I suggested we go out and see how the seas were, but everyone else knew better and persuaded me to try again on Sunday. While we were all sitting on the porch, we started discussing the next bridge to shoot and how I wanted to do a ‘reconnaissance mission’ for the recon-mission. Brenda thought I was out of my mind, but my trusty photography friend Tom completely understood. I wanted to know what equipment I would need to assist taking the shot and be prepared with the equipment when we did the recon-mission.

After a quick change into our hiking gear and photo bag packed (with various tools including gaffers tape), we started out on our recon-recon mission. We were headed for Little Harbor Brook Bridge with a stop-over at Cliffside Bridge to see what was involved in shooting that bridge – heck, it was on the way!

We spent a fair bit of time at Cliffside Bridge and finally settled on a shooting location, best way down to the bridge, lighting locations and some ideas about safety concerns. Here’s the shot from the location.We wanted to be sure and include the weep hole and the cliff under the bridge in the picture.

We continued to Little harbor Brook Bridge, keeping in mind our ‘hard-turn-around-time’ of 11:50. After looking at some pictures online, I knew what shot I envisioned. I was hoping for a high shoot at an angle to capture both walls with the ends offset. To get that shot my tripod needed to be higher. I broke out the gaffers tape and proceeded to tape our Leki hiking sticks to the tripod legs. It worked as a proof of concept and the image is very close to what I envisioned. After reviewing the image and the scene in front of us, we identified a number of locations requiring lighting. Though this is a small bridge, there are some complex lighting challenges. As a bonus the date stone is visible too.

We took the Asticou Trail back, which turned out to be a nice hike and quicker than the carriage road. We realized that in the future, maybe we could recon two bridges in one day and we didn’t have to do it during dusk, now that we understand how to light a bridge.