Fair weather has returned to the shoots.
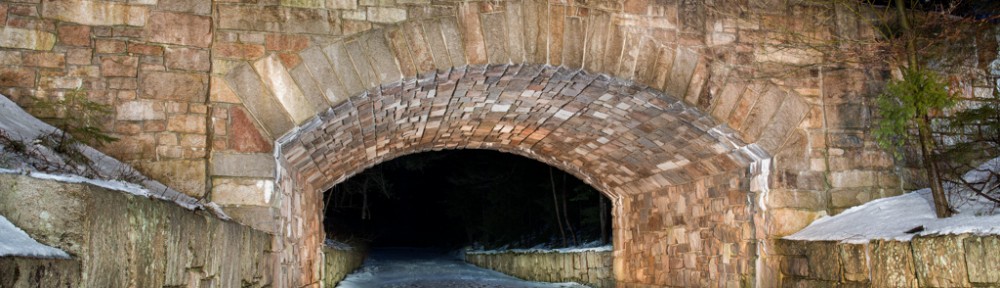
This was our first attempt at lighting a bridge with multiple barrels. Deer Brook Bridge has two barrels, with a stream running through it. Given last week’s rain, we asked folks to wear waterproof shoes – they might be standing in the stream.
The necessary technology to run the shoot continues to grow. We have added walkie talkies for improved communication. Tom reminded us on the hike in that is was much more simple at the beginning, just a camera and a tripod. Now we’re using a tethered laptop, the walkie talkies, we have much more light power, and of course, the treats have to be carried in as well. Actually, here’s the checklist we review before leaving the house.

When we arrived at the bridge, there were already 5 new folks there! Tom was video taping this shoot to document the process, so we headed down under the bridge to set up our tripods while Brenda got people set up with lights.
The pre-shot, with painters looking over the edge:

Notice the angle of the pre-shot is different from the angle of the final shot. With the challenge of the double barrel, I found it difficult to keep folks hidden in both barrels. I had to adjust the camera angle in the middle of the shoot to hide the people, not an easy feat while standing in the middle of a stream and being tethered to a computer.
The final shot:

The shoot went smoother than usual, only needing to rearrange one person to even out the light. We think this was due to the number of people who showed up that night. We’re thankful for all 27 participants! The largest assembly of people for a bridge shoot yet.
Click on the video below, taken by Tom Lawrence, to see the light painting:
The light painters:

We welcomed six new light painters and all enjoyed Brenda’s apple cupcakes for a snack. For the raffle, Catie’s name was pulled first and she wasn’t there to win. Then, Jim’s name was pulled and he won the extra big print of Hadlock Brook Bridge. Then, come to find out from Kim at work, Catie hadn’t been at the previous bridge shot, it was Emma, and she was here too. So she should have won. To make up for it, we gave her a metal print. She’s the first person to own an official metal print, the chosen medium to display the prints at the end of the project.
